Cyber attacks evolve in sophistication daily, and they’re becoming increasingly common. Consequently, only passwords cannot keep your digital information and assets safe. That is where two-factor authentication comes in. It adds an extra security layer to your online accounts.
This article explains everything about 2FA in detail. Learn how to enable it on different platforms to boost your account security, making it challenging for hackers to break in.
What is Two-factor Authentication?
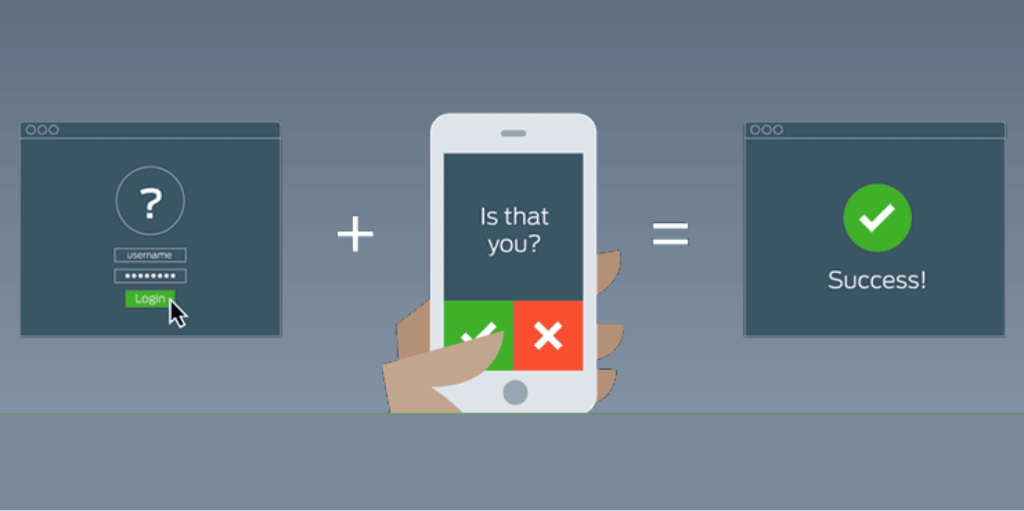
Two-factor authentication (2FA) enhances security by requiring two different methods to confirm account access. First, you enter your password. Then, you receive a code, answer a question, or use biometrics for verification. It is also called two-step verification, dual-factor authentication, or 2FA.
Why is 2FA Important?
A password alone is prone to hacks and data breaches, which is why 2FA is essential. With it, you put more security checks in place to prevent hackers from stealing your digital accounts.
Even if someone knows your password, 2FA provides a one-time code for a short time via SMS or email. Thus, they cannot continue to log in if they do not have your mobile device. It also notifies you on your phone if someone tries to access your account so that you can report the activity and stop it immediately.
Furthermore, some platforms enable you to sign in with your biometrics as part of the 2FA. That way, only you can open your account.
How Does 2FA Work?
First, you provide the platform or site’s login details (usually username and password). Then, the second step may take any of these forms:
- The website or app operator sends a one-time code to your registered phone number. You enter this code to confirm your sign-in.
- Alternatively, the platform may use your biometrics: fingerprint, eye scan, face ID, or voice recognition.
- Another method is for the operator to request a valid ID to verify your identity.
Once you pass these two verification modes, you prove that the account is yours and access it.
What are Authentication Factors?

2FA is classified into different factors. These include Knowledge, Possession, Inherence (Biometric), Location, and Time factor. Here is a simple explanation of each element in its adoption order:
- Knowledge factor: This verification process lets you use your knowledge to approve your entry. For instance, passwords, pins, and secret questions are things you know.
- Possession factor: Here, you use a passkey, your document, or means of identification to prove that you are the account holder. Also, an online platform may send an SMS or email code to ensure you are with the device you log in with.
- Inherence (Biometric) factor: This uses a part of your unique biological make-up, such as fingerprint, eye, face, or voice, to verify that you are the one.
- Location factor: Certain digital platforms restrict access to authorized devices in approved locations. They do this by checking the Internet Protocol (IP) address or using GPS and other location-tracking systems for verification.
- Time factor: This gives users a specific time frame for signing into the account. Once the time elapses, the login session expires.
The most common ones used are the knowledge, possession, and inherence (biometric) factors. Note that the authentication involves a combination of any two of these factors.
For example, a site that enables a password (knowledge factor) and identification code or document (possession factor) uses 2-step verification.
If the website uses only a password and a security question, it does not qualify as 2FA because both checks involve the knowledge factor. Thus, it is a single-factor authentication.
Two-factor Authentication Examples
Google, social media, fintech apps, and other platforms use 2FA when you sign into your account on a new device. Once you type in your email address and password, it sends a one-time PIN to your registered phone number.

Other examples of two-step verification are ATM and online payment processes. These let you use your bank card (possession factor) and ATM or bank PIN (knowledge factor) to perform transactions.
Even the process of international travel involves dual-step verification. It requires valid travel documents (a passport) and uses biometric scans to validate your identity.
How to Enable 2FA
You can quickly set up 2-step verification for your online accounts. Below is a step-by-step guide for different platforms.
On Google Accounts
Follow the instructions below to activate the Google 2FA:
- Enter your Google account.
- Tap on your profile picture.
- Select Manage your Google Account.
- Choose security in the tab and click 2-Step verification.
- Click on Get Started.
- Type in your password.
- Select your preferred mode of verification from the options: Google prompt, security key, text message, or voice call.
- Confirm the Google notification on your mobile phone based on your chosen verification mode.
- Include a backup email or phone number. Pick between text message and voice call to receive a code. Then, click Send.
- Input the verification code Google sends to your phone in the Google 2-Step Verification settings. Then, select Send.
- Lastly, choose Turn On. You will get an email verifying the process.
On iPhone

Below are the steps to use 2FA for your iOS device:
- Visit Settings on your iPhone. Then, click on your name. If you use iOS 10.2 or an older version, open Settings, select iCloud, and click on Apple ID.
- Go to Sign-in and Security.
- Press Turn on two-factor authentication and tap Continue.
- Enter the phone number of your verifying device and confirm your identity.
On MacBook
- Open System settings in the Apple menu. Suppose you use macOS Mojave or an earlier version, open System Preferences and tap iCloud. Then, select Account Details.
- Tap on your name or login with your Apple ID.
- Press Sign-in and Security.
- Select Two-factor authentication and tap Turn on.
- Pass the security questions and press Continue.
- Type your phone number and confirm your identity.
On Windows
If you use Windows 10 or 11, follow these steps to strengthen your security.
- Enter your Microsoft account or sign up if you do not have one.
- Go to Security.
- Select Advanced security options.
- Verify your identity through email, phone number, or Microsoft’s Authenticator app.
On Facebook

- Press the menu button at the top right corner of the display.
- Go to Settings & Privacy and choose Settings.
- Click on Password and Security.
- Select Use two-factor authentication.
- Add the security measures you want between using a security key, text message codes, or a third-party authentication app.
Once you have switched it on, you can use up to 10 recovery codes if you cannot access your phone.
On Instagram

- Click on your profile picture at the extreme bottom right corner of the interface.
- Press the menu button at the top right side and go to Settings and Privacy.
- Tap on Accounts Center and pick Password and Security.
- Enter dual-factor authentication and choose your Instagram handle.
- Tap Authentication App and select Copy Key or View barcode/QR code to link your handle to the authentication app.
- Copy the six-digit confirmation code from the authentication app and paste it into your Instagram app to complete the process.
Note that you can have up to five devices linked to dual-factor authentication for an individual Instagram account. You can also remove any of the devices when you want to. Additionally, you can use your Instagram key if you have multiple authentication applications on the same device.
On WhatsApp

- Tap the menu (three vertical dots) button at the top right side of the screen.
- Scroll to Settings.
- Tap Account.
- Select Two-step verification.
- Click on Turn on.
- Input a preferred six-digit PIN and confirm it.
- Provide your easily accessible email address. You can skip it if you do not want to add your email. However, it is advisable to include your email as it lets you reset the dual-factor authentication and safeguard your account.
- Tap Next.
- Confirm your email and press Done.
If you forget your PIN, you can only reset it after seven days. However, WhatsApp sends reset procedures to the email address you added. It is also essential to note that WhatsApp does not allow you to delete your account after you activate two-step verification for security purposes.
What is the Difference between MFA and 2FA?
The main difference between both is that 2FA combines only two factors to permit entry into your account. On the other hand, MFA, or multi-factor authentication, uses two or more factors to authenticate your identity. For instance, an application that combines a password, verification code, and fingerprint sensor uses MFA.
Is Two-factor Authentication Secure?
Two-step verification is an effective security system employed by many people. Although no sign-in method is completely fail-proof. 2FA increases your confidence in blocking unauthorized persons from hijacking your account. However, you must refrain from sharing any code with a third party and be careful with online links you click, as they may be a potential threat.
Are my Passwords No Longer Secure enough?

Most users use weak passwords for their accounts. Hackers can easily crack these passwords through brute force attacks, phishing, keylogging, password spraying, and identity theft. This enables them to copy, steal, or manipulate your passwords.
Creating a strong password through a strong password generator tool makes your accounts secure to some extent. However, enabling two-step verification adds extra shields. Unlike a strong password alone, 2FA offers multiple defenses against attacks and protects your data better.
Improve Your Data Protection with a VPN
You can never be too careful when it comes to securing your digital life. One of the best ways to stay safe online is to hide your digital footprint using a virtual private network (VPN).
A VPN conceals your IP address, safeguarding you from potential threats. While you set up 2FA, ensure your safety with a top-notch VPN like ExtremeVPN. It keeps your data away from the eyes of cyber predators.
